Arc ModelBuilder
Finally, let's use our model to build a Python script and run that.
Right-click on the model and Edit... it. Under the Model menu, choose Export and To Python Script.... Save the script somewhere you can find it, calling it something other than "Explosion".
Next, right-click your toolbox, and Add then Script..., adding the new script into the toolbox. You'll get a series of dialogs for importing the script: change the name if you like, but leave everything else with the defaults.
Once imported, open the script up by right-clicking it and selecting Edit.... You should see that Arc has written the Python for you.
What you may find is that it doesn't do a great job of linking up different commands. For example, you may find the final intersection command looking like this:
arcpy.Intersect_analysis("# #;# #", Intersect__3_, "ALL", "", "INPUT")
It is missing the input data to intersect, and has replaced them with
"# #;# #". A quick
Google suggests this should be a Python list of input variables, so adjust this line to:
arcpy.Intersect_analysis([Layer,Output_Feature_Class], Intersect__3_, "ALL", "", "INPUT")
Making sure you use whatever equivalent variable names your copy uses (here "Layer" is the buildings, and "Output_Feature_Class" is the buffer output.
Next, go back to your toolbox, and right-click the modelbuilder model, and open its Properties. Go to the Parameters tab. You'll see the parameters the model asks the user for. Make a note of the variable order and the type. If your model is like mine, you'll have:
Input features: Feature Layer

Distance: Linear unit

Layer: Layer

Intersect (3): Feature class

Output Feature Class: Feature class
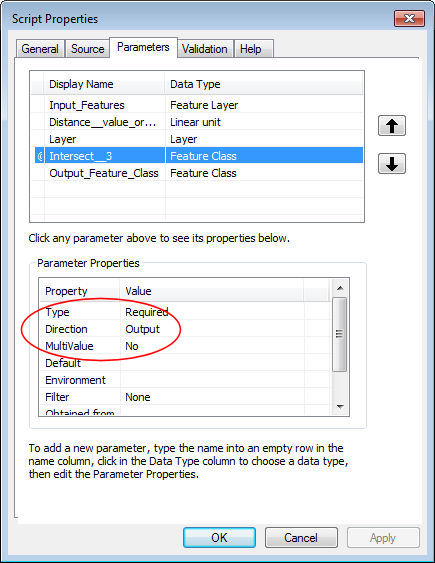
Close the model properties, and now open the Script properties in the same way. Go to the Parameters tab. You'll see it is slightly more involved. By clicking under Display Name you can add parameters that the user will be asked for. Add in the parameters you got from the model, in the same order. It doesn't matter what name you give them (the script uses the order, not the name), but make sure the type is correct: clicking in the Data Type box should bring up a drop-down list where you can select the type.
Note that we also need to tell the system that the two output Feature Classes are outputs. Make sure to adjust the Direction option for the parameters (circled below) to Output. If you don't do this, when the model runs, it will look for the shapefiles typed into these boxes, and fail when it doesn't find them; setting them as outputs means the system will assume they don't need to exist when it starts.

Once all that is done, push Apply and OK. You should now be able to double-click the Script and get it to run.
If you manage that, have a go at tidying up the script. Can you re-order the parameters in the user interface and script and keep it working? If your default for the Buffer output didn't work, can you hardwire one in? Have an experiment with the Script, and then we're done for this practical. Before you go, delete the new intersect layer (NB: you'll need to do this in ArcCatalog, rather than just removing it from the map in ArcMap; the latter doesn't delete the datafiles)
