Arc ModelBuilder
Next we'll add a new modelbuilder model.
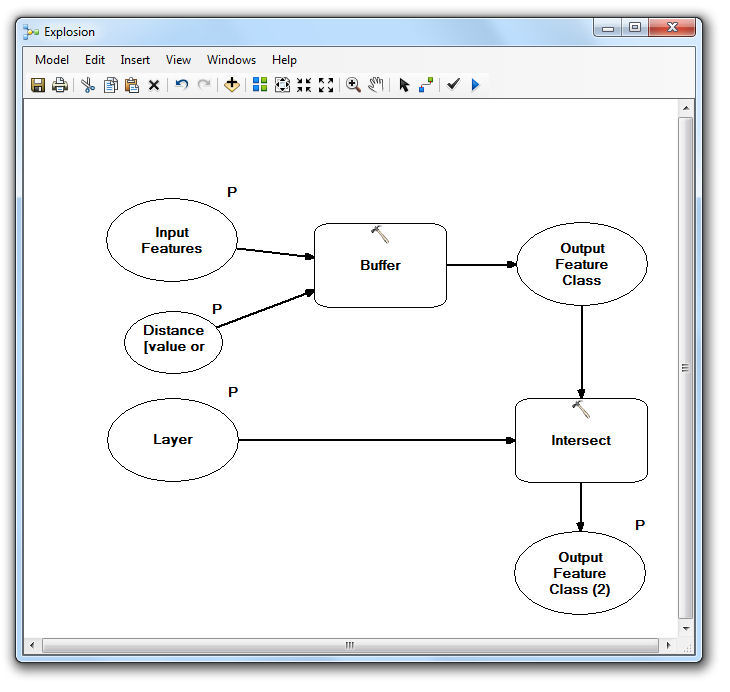
Right-click on the new toolbox, and select New -> Model. This will make the new model, and open modelbuilder. You'll see a blank model editor open up. We're going to fill it with this model (instructions below):

Open up modelbuilders Model -> Model Properties... menu item, and change the name and label to "Explosion". Note that, if you choose to make these different, name is what the model is referred to programmatically; label is just what appears in the toolbox, and has no meaning otherwise - you can't use the label to refer to the model inside programs. Note that the name should be all one word, and try to avoid calling either the tool or the toolboxes the same as anything else.
Now, leaving modelbuilder open, open up the ArcToolbox Analysis Tools -> Proximity. Drag the Buffer tool into the modelbuilder. As you'll see, there's no input data listed. Right-click on the Buffer tool in modelbuilder, and select Make Variable -> From Parameter -> Input Features. This will add a new circle, so you should have both inputs and outputs. We're going to ask the user for the input layer, so right-click on it, and select Model Parameter. Make sure that just this circle is selected when you do this. You should end up with this:

Note that the Input Features now has a "P" next to it, indicating it is something the user will be asked for. Unlike the original 'Using GIS' practical, we're just going to use one buffer, so all we need to do now is tell the tool what size buffer we want. Right-click the buffer tool again in modelbuilder, and select Make Variable -> From Parameter -> Distance [Value or Field]. Note that these menus allow you to set up lots of the tools parameters as variables. Some are essential, others not. The best way to work out which have defaults is to try running the tool directly from ArcToolbox, and seeing what you can get away without. Set the new Distance variable so that the model will ask the user for it, as before. Drag the different components appart so they're not overlapping and they're easy to see.
When you've done that, go on to Part Three, where we'll add a second model component.
