Classes, Objects and Static
[Practical 2 of 11 - Part 1]


Our First Class:

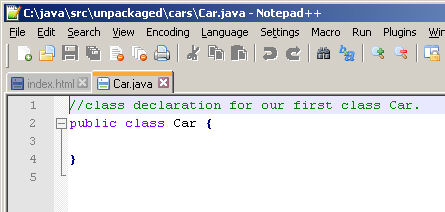
First open up your chosen text editor, notepad++ is the editor of choice here. Type our first class declaration as shown in the screen shot in Figure 1. So what is going on here?

Class Car declaration
Figure 1

This is your first class save it as 'Car.java'. Classes are saved in a file of the same name ending with the extension .java. There are some exceptions to this but don't worry about that for now. Inside the directory tree you created in the introductory practical create another directory in 'unpackaged' called 'cars'. Save your Car.java file there.


Compiling Our First Class:

OK open up a command window the same way you did in the introductory practical. Navigate to the directory you saved your Car.java file in using the cd command. Using the dir command you should see your Car.java file is listed.

To compile your class type javac Car.java and press return. After a couple of seconds the command prompt should return, your class has compiled. If you get an error check you have typed exactly the text shown above. If you see a message saying javac could not be found then the configuration of java on the machine is not setup to run from any location, please talk to your system administrator and read this article.

Once you have successfully compiled your code type dir again at the command prompt and you should see a file called Car.class listed. This is the java byte code file that the JVM reads and interprets to run your program.

See Figure 2.

Compiling the Car class
Figure 2


Introducing static:

OK you now have your first compiled class. That’s great but you can’t really do anything with it. If you try and run it by typing java Car (notice no extension on the class name!) you will get a message as shown in Figure 3.

Error running Car
Figure 3

Right this is where it gets really confusing and you all head for the door, but trust me by the end of the course this will all be clear, so stick with it!

Not everything in Java has to run as an object. There is a way to make something 'class level' (i.e. doesn't need an object to be called) and that is the key word static.

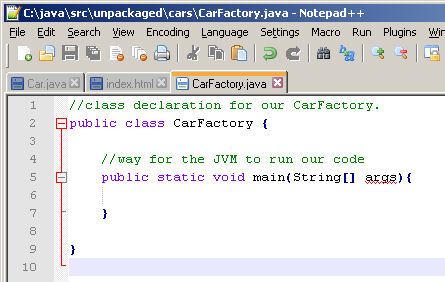
Every Java program will have some code in it that lets us set the program running. So what we are going to do is create another class called CarFactory as in the image in Figure 4. Type in the code as shown, and save this as a new file in the same folder as your Car.java file and call it CarFactory.java (remember the name of the file matches the class name). Don’t worry too much about how all of this works yet it will become clear over the next few sections of the course. The main thing we are examining here is the key word static which means we don’t need an object to use this code.

To compile all of the classes you can either type 'javac Car.java CarFactory.java' or you can type 'javac *.java'. The second option will compile all of the files with the .java extension whereas the first will only compile the two stated files. Notice the indentation in the CarFactory file. Indentation is good practice to make your code more readable. Pairs of braces represent blocks of code, when we are inside a pair of braces we indent to show this when we move back outside we move our text back in line with the last brace. This will become clearer when we cover flow control later.

Class CarFactory declaration
Figure 4

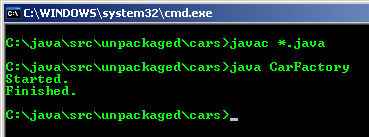
OK now we can run our program which has 2 classes by typing ‘java CarFactory’. Hey presto, no error! OK we don’t get anything else but at least we didn’t get an error, Figure 5.

Running CarFactory
Figure 5


Writing to the Screen:

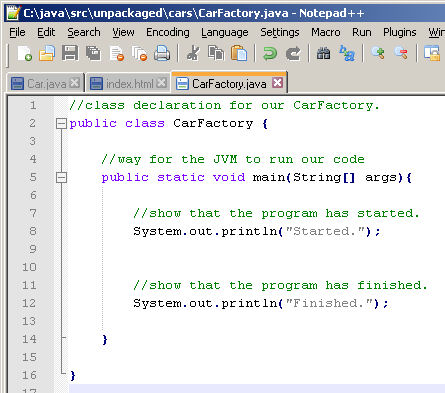
So now we will prove the program is doing something. Adjust our class CarFactory as shown in Figure 6 to show the program has started and stopped. Save the file, compile it and run it again.

You will see that you get the words 'Started' and 'Finished' printed into the command window, as shown in Figure 7. At last it has done something!

Running CarFactory
Figure 7

So what do the lines of code we added mean?

In Java there are many different helper classes and objects, one of these is called System. You know it is a class because… yes that’s right it begins with a capital S.

So we are asking the helper class System to print a line 'println to the default output '.out', which at the moment is the command window.

We end the line with a ; (semi-colon) to tell the JVM that this is the end of the statement.

You can have statements that span many lines and have white space between them but they will all end with either a ; or a pair of braces {}.

Class CarFactory declaration
Figure 6


Instantiating Objects:

OK so far we have written our first 2 classes, compiled them and proved that our program is running. Now we are going to explore some of the things we discussed at the beginning.

The first stage is to give our Car a colour and an engine size. To do this we are going to create two variables the first is a 'String' type called 'colour' which we will use to store the colour of the car. The second is a 'double' type that we will use to store the size of the engine. The more observant among you may have noticed that double has not capital letter at the beginning but String does. That is because double is what we call a primitive data type. String on the other hand is actually a base class in the Java core language which wraps around a 'string' of another primitive type called char. For a full explanation of data types see the course cook book or the Java Tutorial

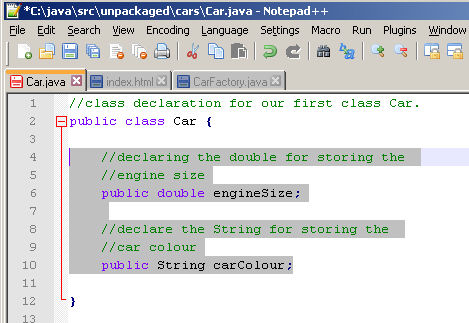
OK so let’s add the variables. Adjust the code in your Car.java file inserting the highlighted lines in the screen shot in Figure 8. This creates two variables for storing the engine size and car colour.

Notice that they don’t have any spaces in the names and each new word has a capital letter, this is called camel case and is a convention for naming classes and variables when writing code. Also notice that the first letter of the variable names are lower case, this shows that these are not classes but variables and helps make your code more readable to you and others. OK now the car has 2 attributes, engine size and colour.

Class Car with attributes added
Figure 8

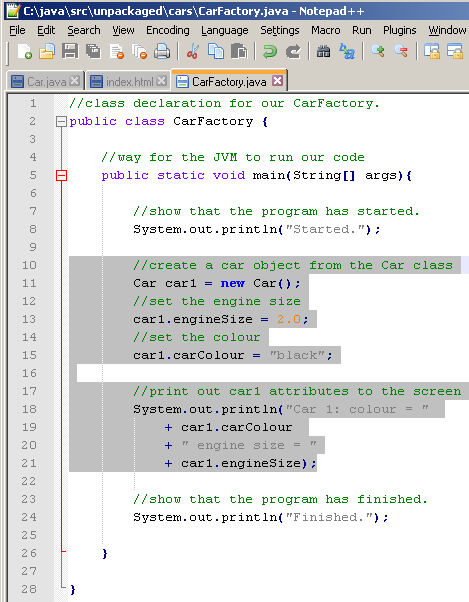
In our CarFactory.java file insert the lines highlighted in the screen shot in Figure 9. We have inserted four lines of code, although the last line is split over four lines it will run as one line of code ending when the interpreter reaches the ; character.

  • The first line does two things.
    1. On the left side of the equals sign we create a variable called car1 (notice the first letter is not a capital, therefore this is the name of a variable) of type Car (note this does have a capital so it is the name of a class).
    2. The right side of the equals sign instantiates a new object of type Car and assigns it into the variable car1.
    This could have been done in two separate lines like this
    • Car car1;
    • car1 = new Car();
    but it is common to do the two operations in one statement.
  • Once we have created the new Car object we set the engineSize variable by using the . operator. This looks inside the object referenced by the variable car1 and finds the variable engineSize. It assigns a value to it by using the equals sign. Finally the value to be assigned is stated (in this case 2.0).
  • Exactly the same happens with the carColour variable.
  • The final line of code we have added spans four lines but simply prints the values of car1's attributes to the screen with a little text to show that they have been set.

CarFactory instantiating its first car
Figure 9


Creating More Objects:

The object car1 has been created from our class Car which is great but we only have one Car class and one car1 object. but what if we need to create many car objects?

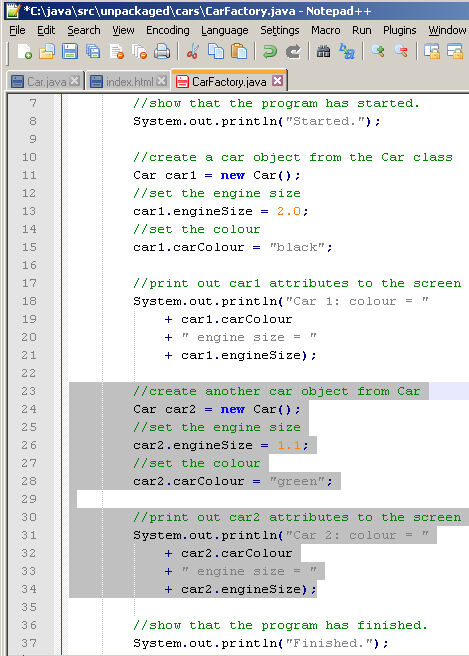
To do this we can add another car, car2. Type in the lines highlighted in the screen shot in Figure 10 to your CarFactory.java file save and compile the whole program again.

Note: because we are now building up quite a lot of code in our CarFactory.java file only the relevant section is shown and not the whole file but the location of the new code is indicated by the line numbers.

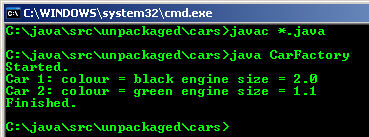
Now run it and you should see two cars listed on the screen as in Figure 11.

Two car output
Figure 11

They have different colours and different engine sizes. This is part of what we mean by encapsulation, every object created from a class has the same attributes (in this case car colour and engine size) but they can be set independently for each object. That means each car can have a different engine size and colour.

Another aspect of encapsulation is that the attributes should also be meaningful to the object and this a subject we will return to later in the course.

CarFactory instantiating two different cars
Figure 10


The first part of this practical has introduced objects and how we can instantiate them from a class. Part 2 is going revisit the static keyword in more and detail and show some common mistakes made when using static

Continue to part 2 of the practical