Data Input / Output and JUnit
[Practical 8 of 11 - Part 2]
How To Begin:
When starting to satisfy the test conditions the first thing to be considered is the order
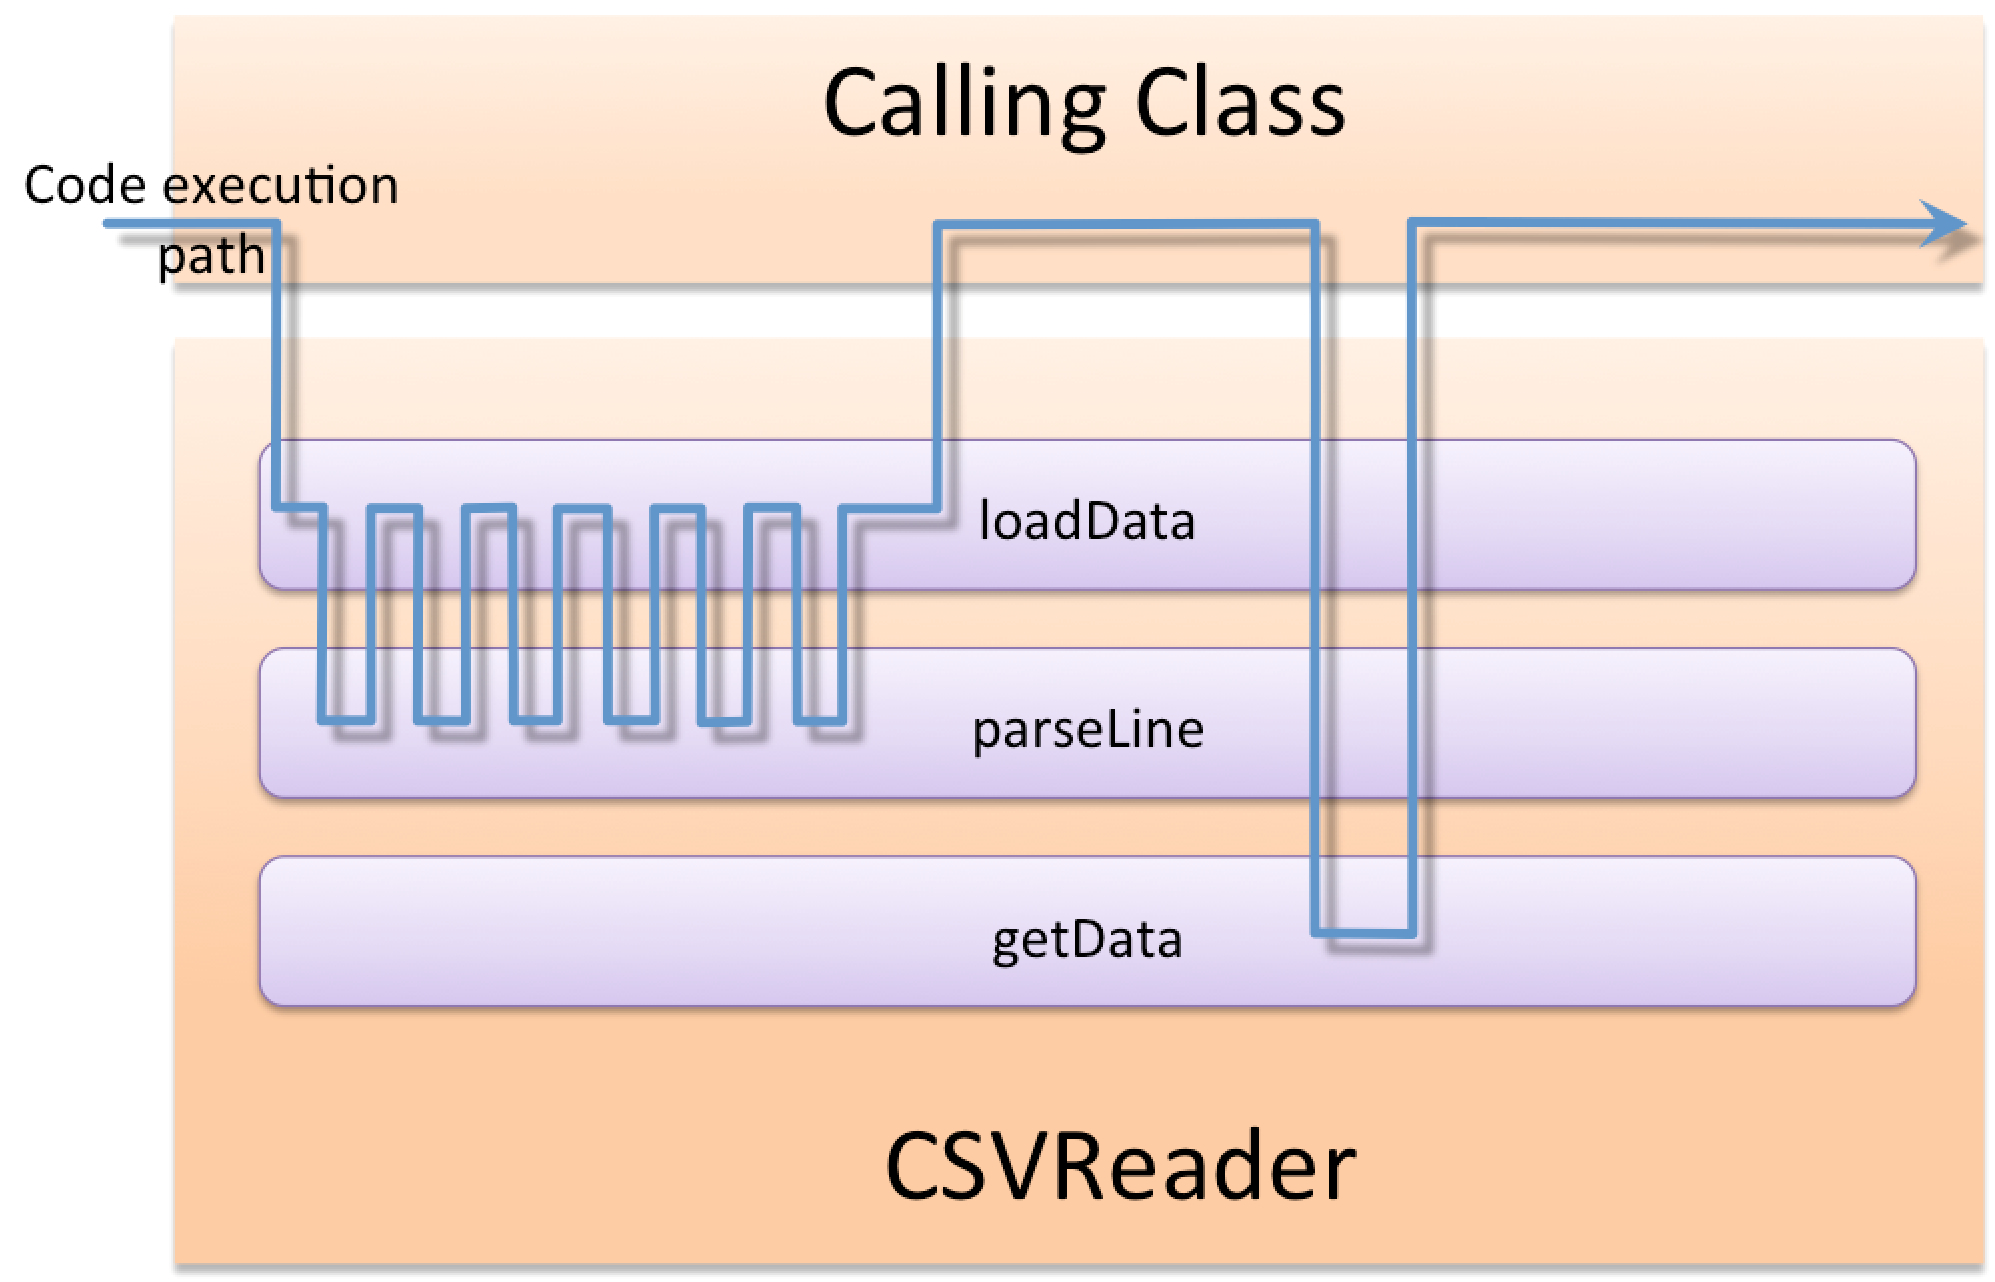
of code execution. Figure 19 shows the order of execution for the CSVReader class.
Code execution enters the CSVReader class from a calling class first through the
dataLoad method. The dataLoad method in turn makes several calls to the
parseLine method to parse the fields out of each line of the input file. Finally, once
the file processing has been completed the calling class makes a call directly to the getData
method to retrieve the data.
When deciding where to start with satisfying the test conditions the method dependency dictates the code
creation order. The call to getData happens after the other methods have occured, so this method
is dependent on the other two methods to return successfully. Therefore, the getData test conditions
will be the last to be satisfied.
The loadData method is dependent on calls to the parseLine method returning correctly.
However, the parseLine method is not dependant on any other method in our test scope. Therefore, we
first get the test conditions for parseLine to be satisfied and then loadData and finally
getData. We work up through the method dependencies.
Specifying Delimiters:
Before we do anything with the code for satisfying the test conditions we need to be able to specify
the delimiters for our file. Because the CSVReader and CSVWriter both need
to have this functionality the code is placed in the super class that both of these
inherit or extend from, CSV.
We want delimiters to be specified from a list of valid character selections, but nothing outside of this
list. We could make the delimiter a String data type with no other limits but that would
allow anything to be entered, and the behaviour we desire is to have a selection list from which users choose.
This could be achieved through the use of constants (declaring a variable final static meaning
it cannot be changed and can be accessed at the class level. Anything declared final cannot
be altered after declaration so a final method cannot be overridden). This approach would be
messy and difficult to control.
Fortunately for us Java provides a data type that we can specify very rigidly and very elegantly. It is called
an enum.
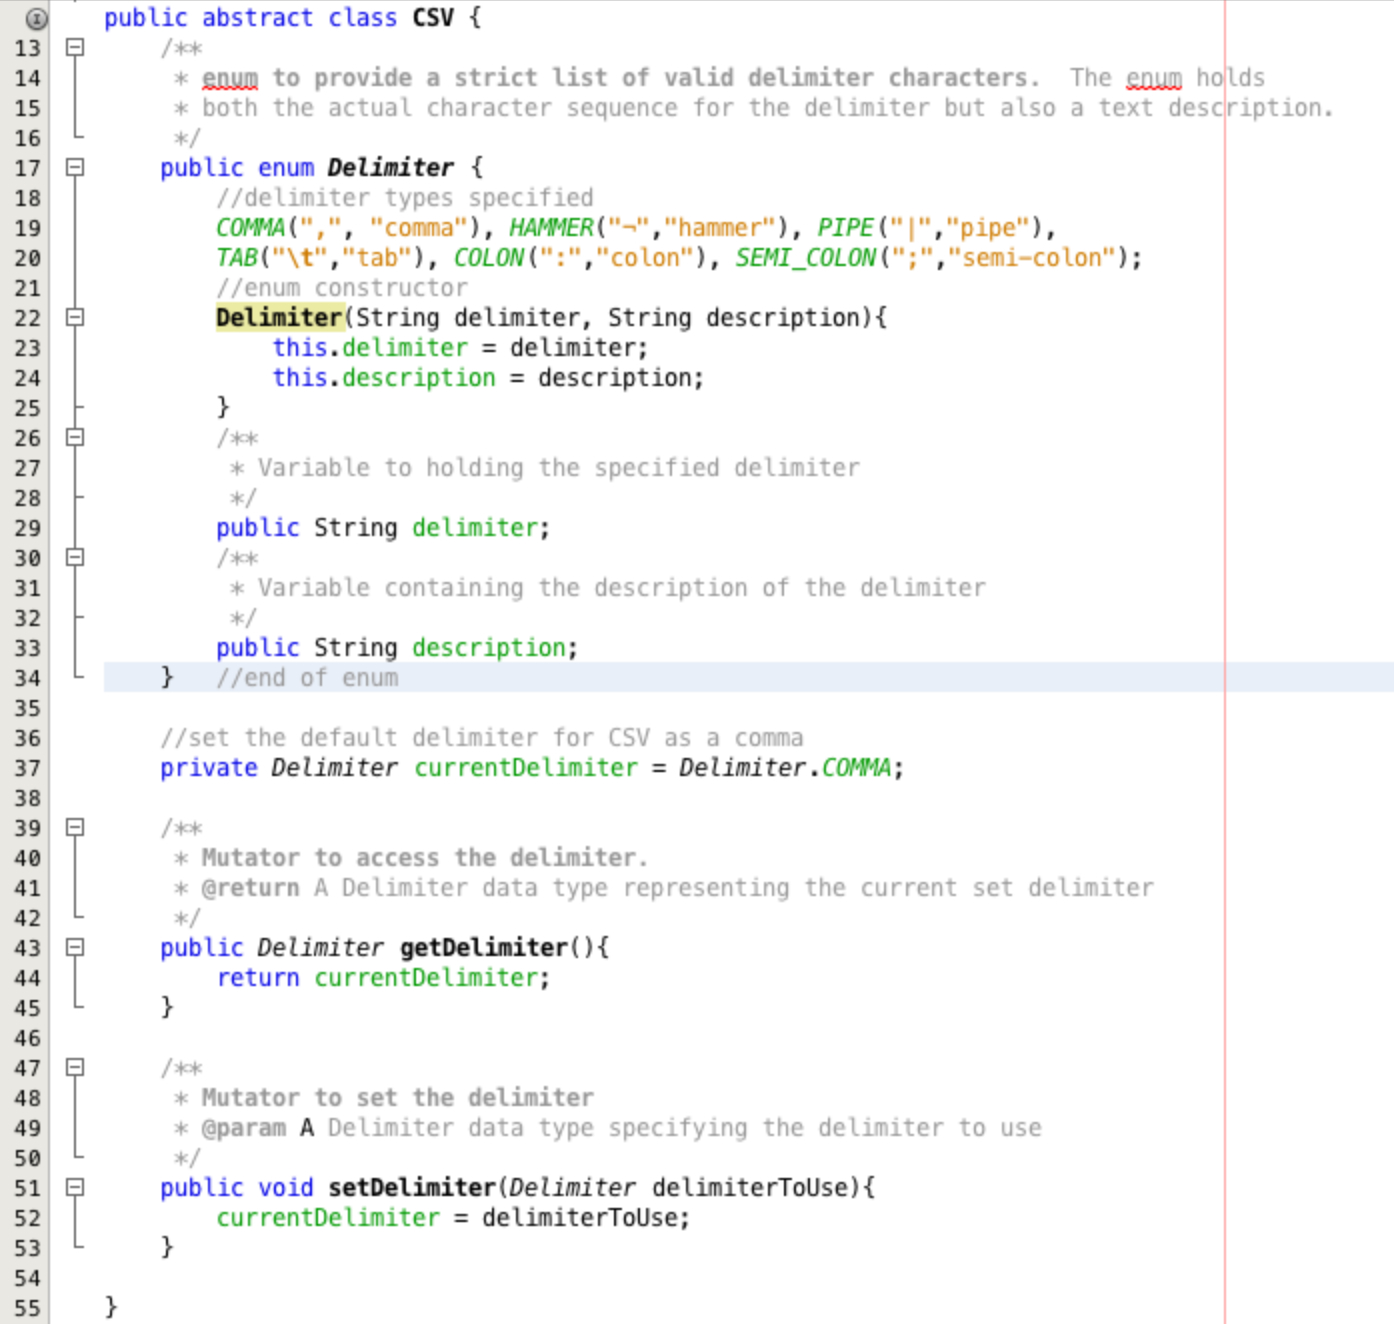
Insert the code shown in Figure 20 into your CSV class. Although it looks quite complicated
most of this code you will be relatively familiar with. Lines 36 through to 53 provide a private
variable to store the current set delimiter which is instantiated to be a Delimiter type and
a COMMA type of the Delimiter data type (we will explain this more in a moment) and
two mutator methods to get and set the delimiter.
The real magic is happening between lines 13 and 34. To start with think about an enum as a
small class within a class. All it does is store a specific set of valid values and any variable declared as
this particular enum has to be one of those values. It is a way to enforce strict data types, similar
to domains in SQL if you are familiar with those.
Lines 22 to 25 provide a constructor for the enum, this can only be called from
within the enum declaration. The lines at 29 and 33 provide variables to hold and provide access to
the values in this particular enum.
lines 19 and 20 specify the list of valid enum types, by making calls to the constructor. The constructor
can be called here because it is inside the enum declaration. To create a comma Delimiter
the code Delimiter.COMMA would be used, as it is in setting the default value on line 37.
To access the delimiter character sequence for a hammer delimiter
the code Delimiter.HAMMER.delimiter would be used, and to get the description
Delimiter.HAMMER.description. These calls would return '¬' and 'hammer' respectively.
Implementing parseLine:
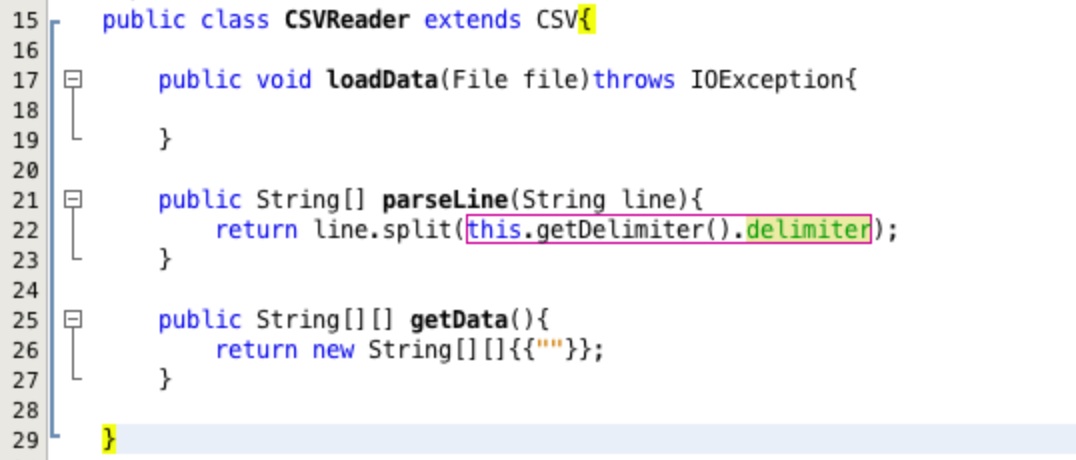
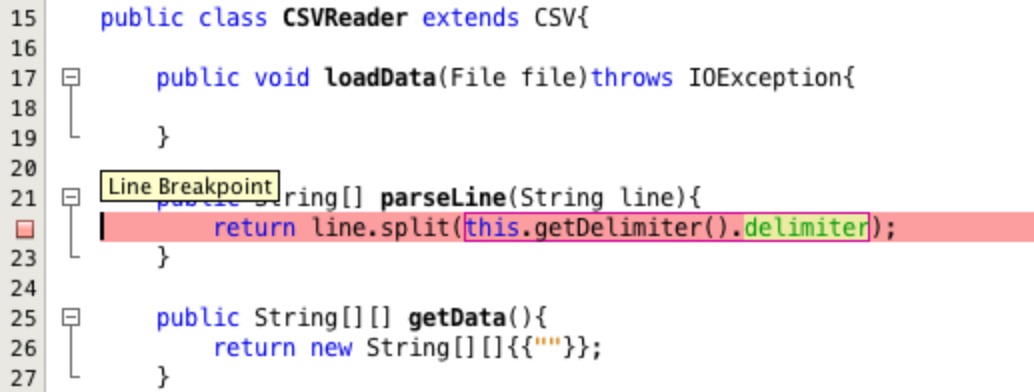
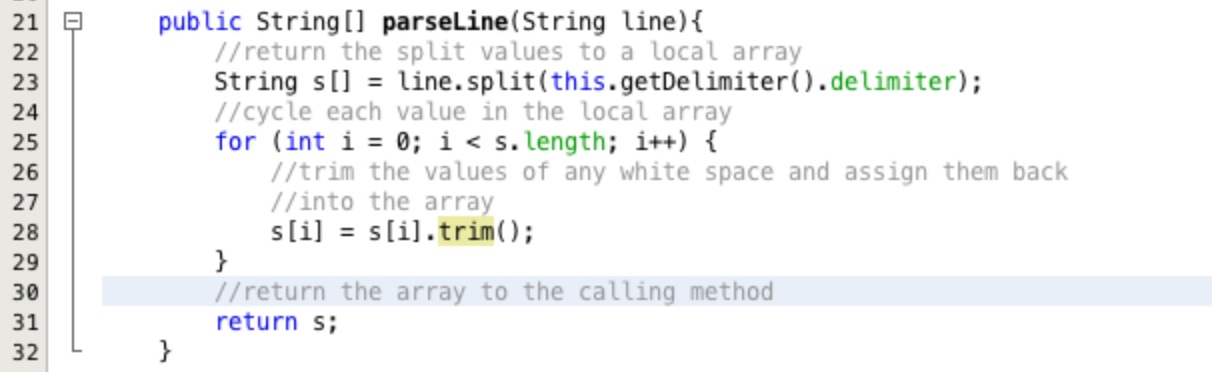
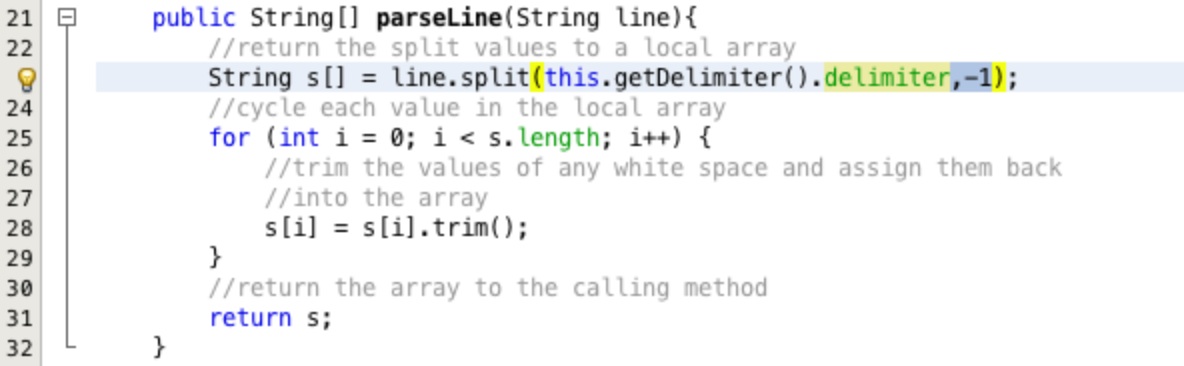
Now that the delimiter can be specified the parseLine method can be written. Lets start by
using the inbuilt functionality of the String class. Type the line
return line.split(this.getDelimiter().delimiter); into the parseLine method as
shown in Figure 21.
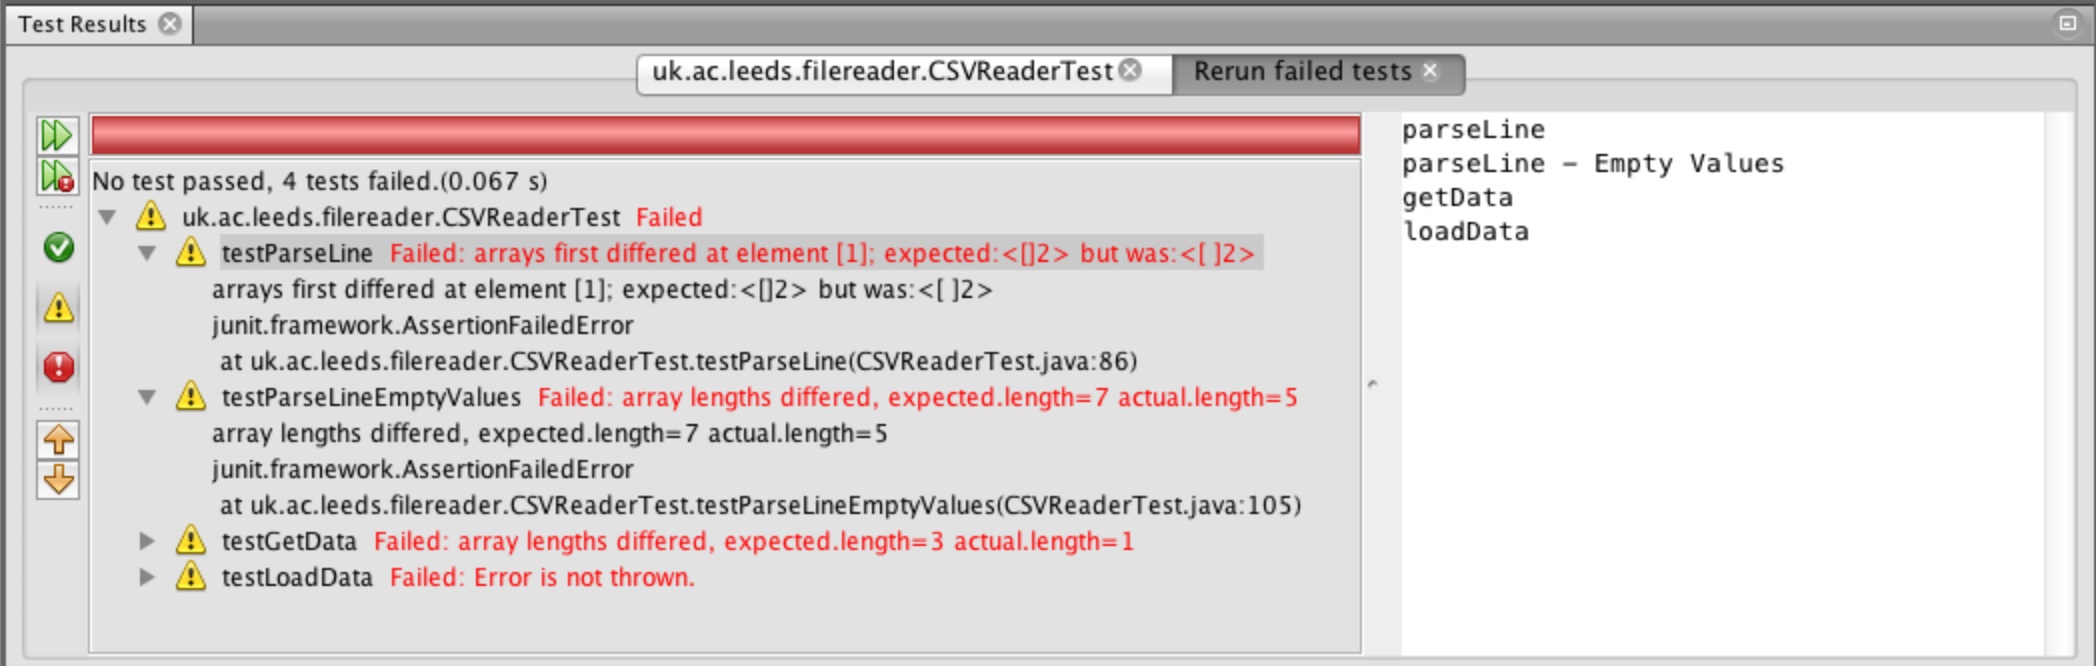
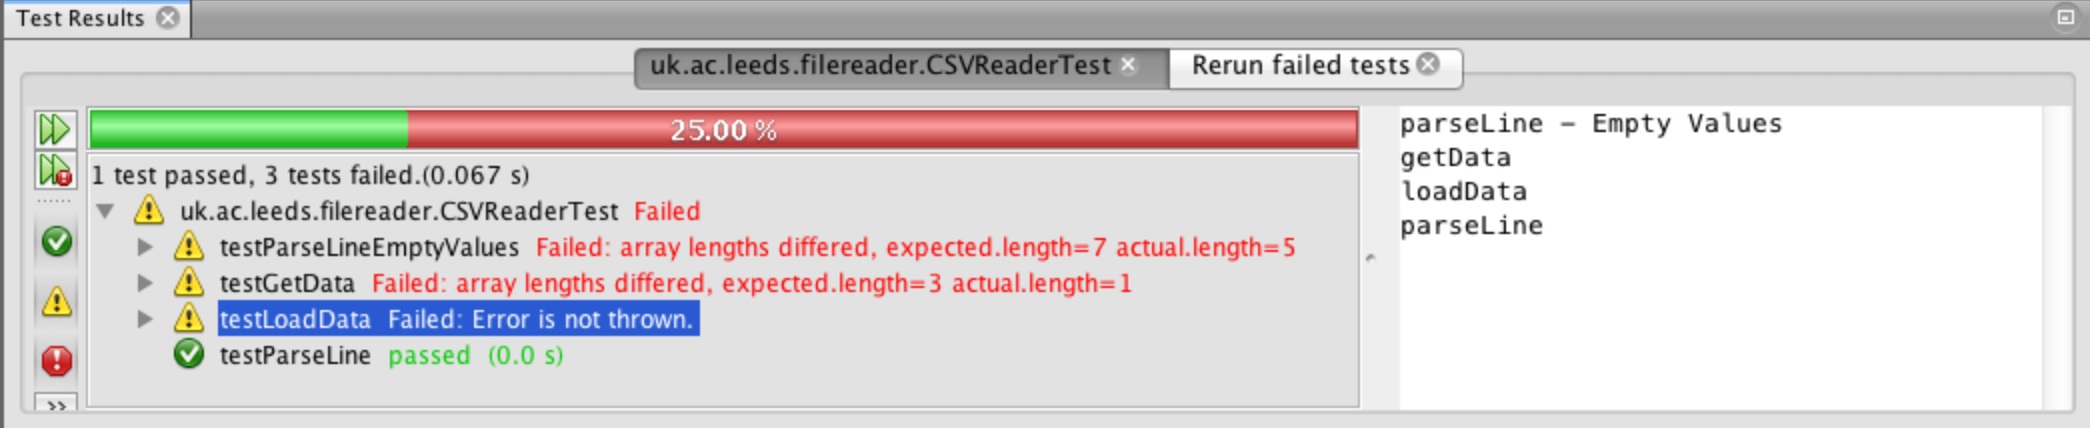
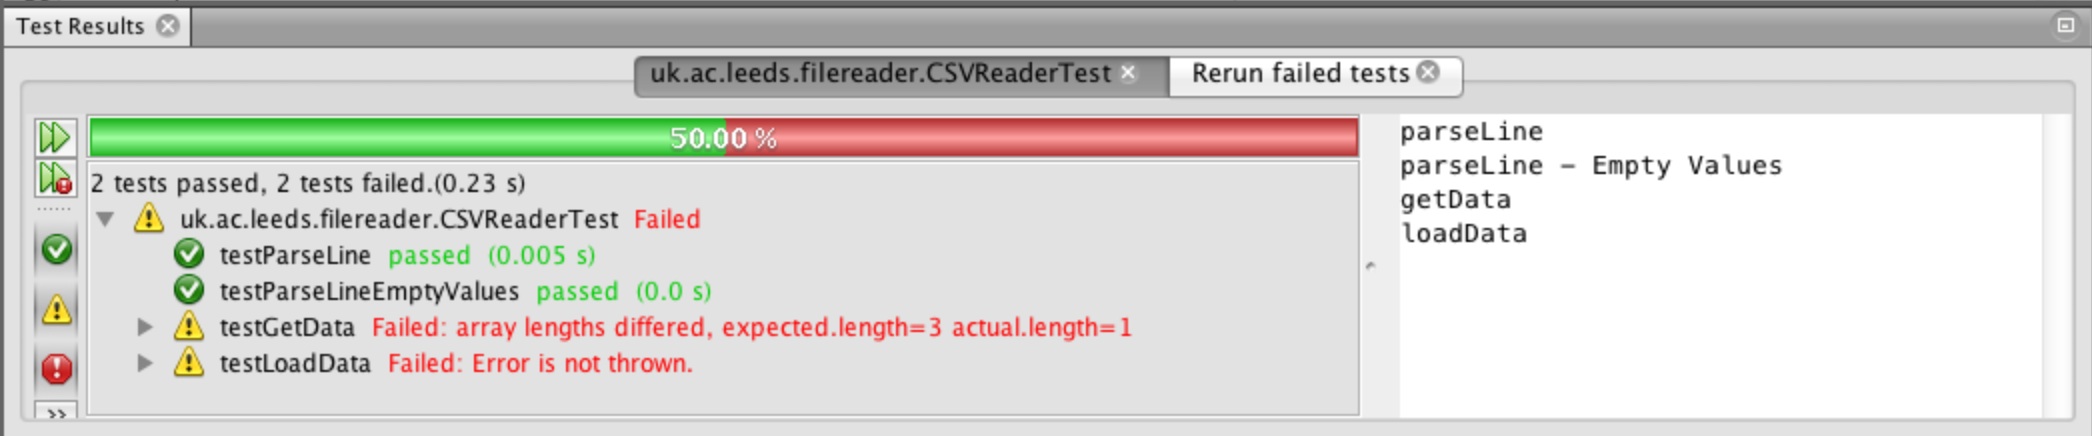
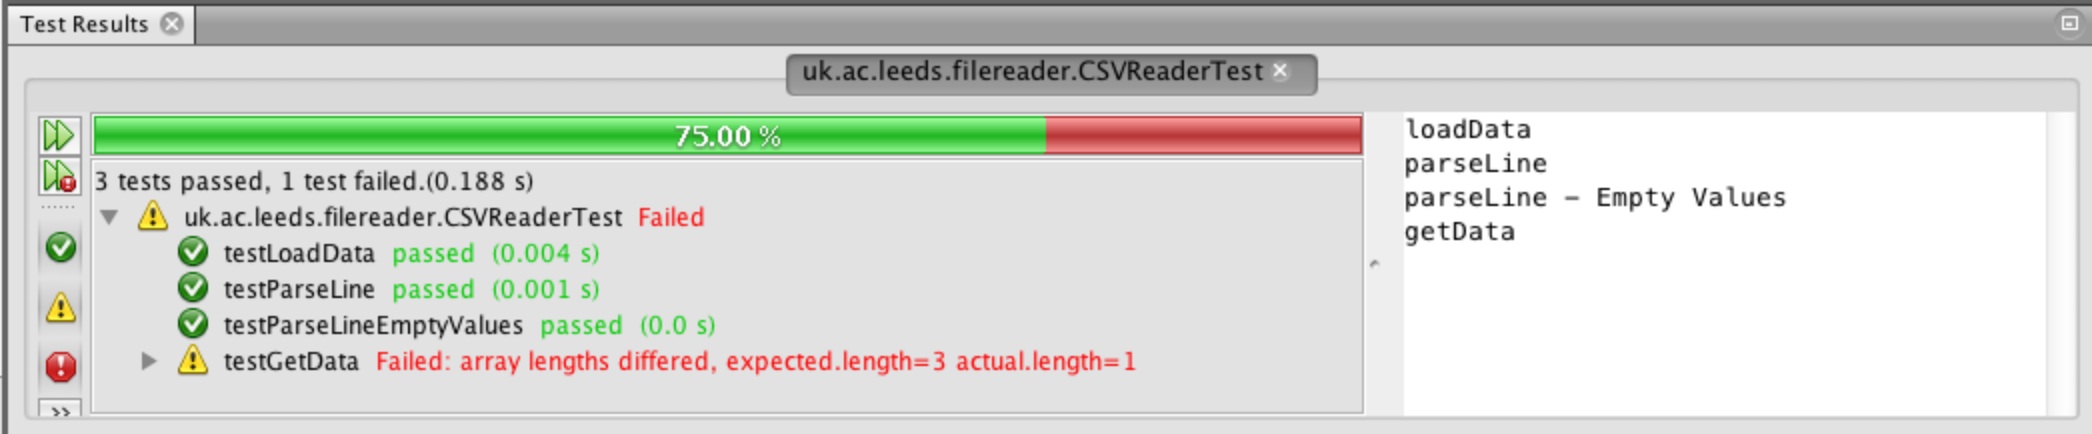
Run the tests as you did at the end of part 1, right click the file and select Test File. All of the tests conditions are still failing. Lets have a closer look at why.
We can see the output from our tests in Figure 22. Note: you can toggle the view of failed and passed tests and those that resulted in an unexpected error by using the three buttons (green tick, yellow exclamation and red exclamation)
By clicking on the little arrows at the side of the tests we can
see more details about why the test failed. We can see that the testParseLine failed because of a space
before the character 2, the square brackets highlight the character causing the discrepancy. The test
testParseLineEmptyValues failed because of the length of the two arrays different, expected = 7 and
actual = 5!
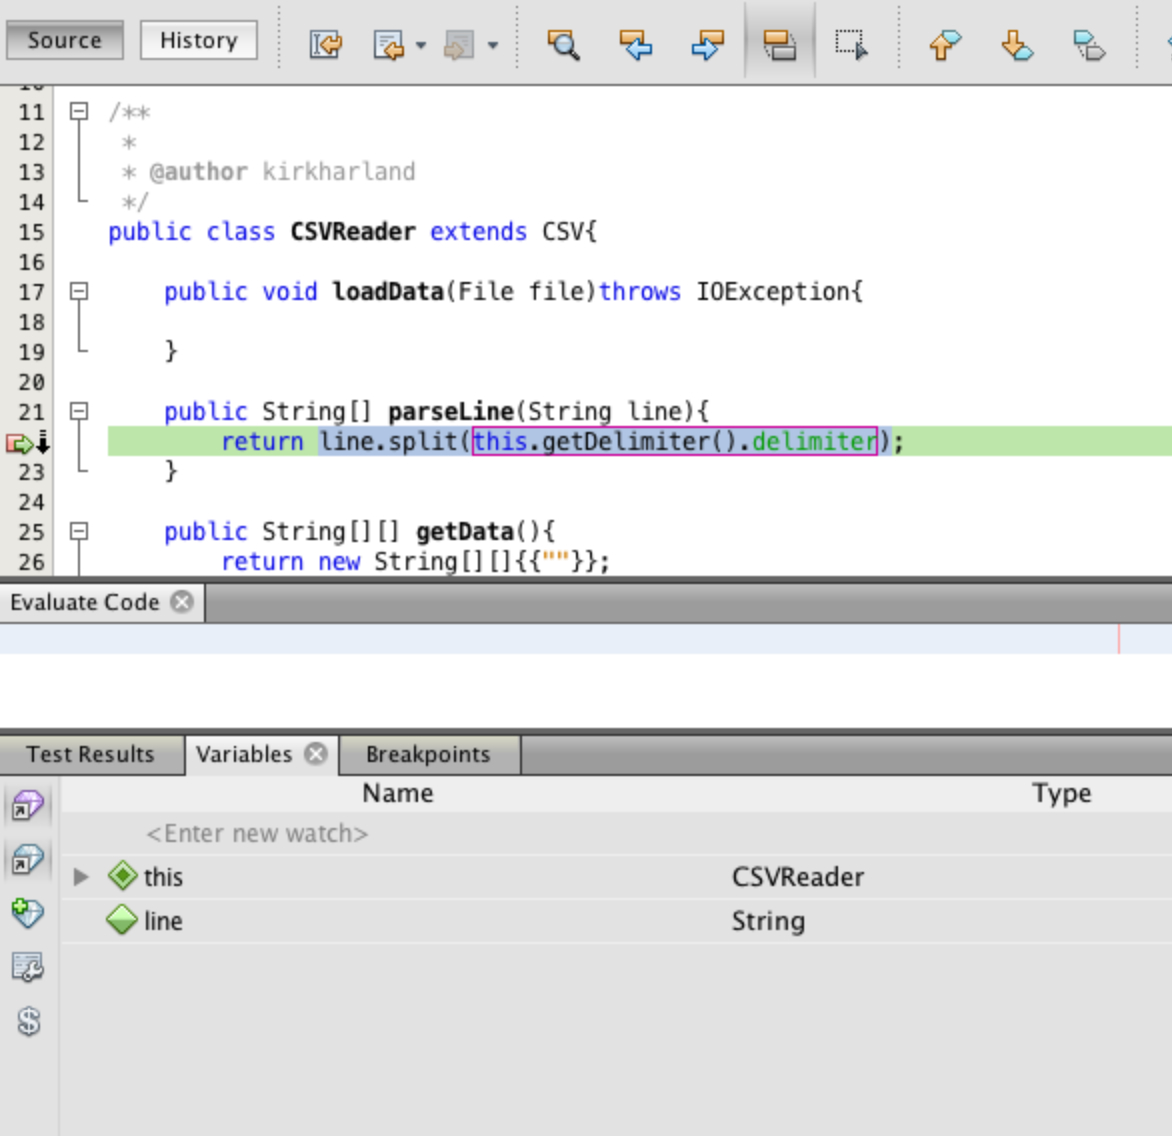
Lets have a closer look at what is happening. To do this we are going to use functionality in the IDE to debug the code line by line. First left click in the margin of the text editor to add a breakpoint. This is a line of code where the execution will stop and wait when we run in debug mode. Figure 23 shows the location of the breakpoint.
Next right click on the CSVReader class in the project area and select Debug
Test File. When the code execution reaches your breakpoint it will turn green as shown
in Figure 24.
At the bottom of the screen in the output area you will have a variables tab which is active. where
it says <Enter new watch> type the line of code that we are interested in seeing
the return values for line.split(this.getDelimiter().delimiter) and press return.
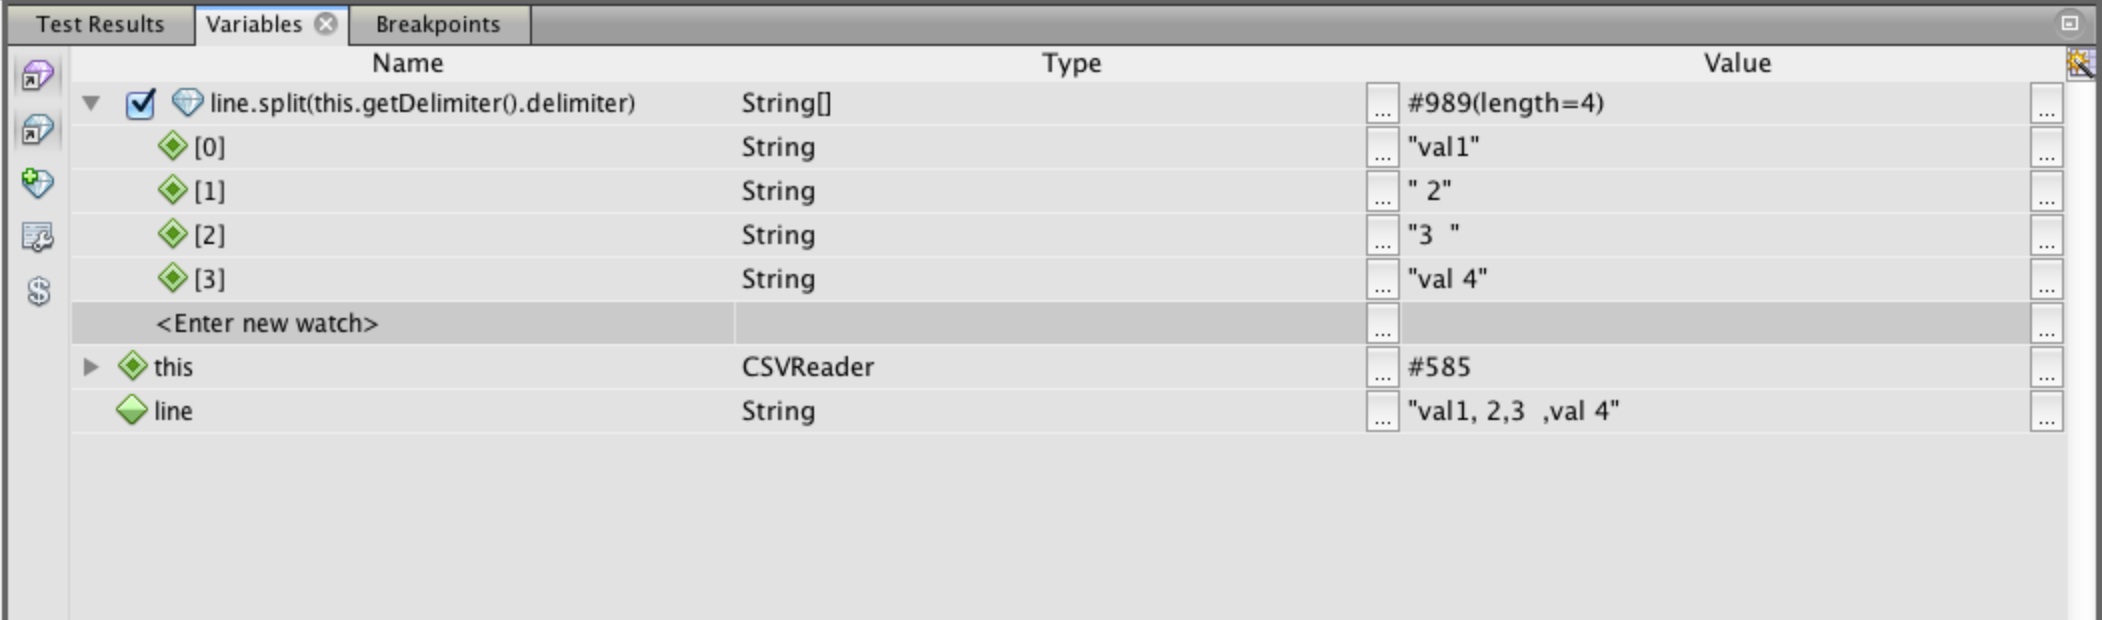
A watch expression is a way of viewing what is in a variable of method return during the debug process. You can add, alter and delete watch expressions as you see fit to help you understand what your code is doing.
Clicking on the arrow to the left of the new watch expression expands it showing all of the elements in
the array returned by the split comment, Figure 25. We can see that the split is returning leading and
trailing spaces for the values between delimiters, the spaces are in the original input line, shown at
the bottom of the variables display.
We need to chop the extra spaces from the beginning and end of each value. There is a function to help us
do just that in the String class. First we need to exit the debugging session.
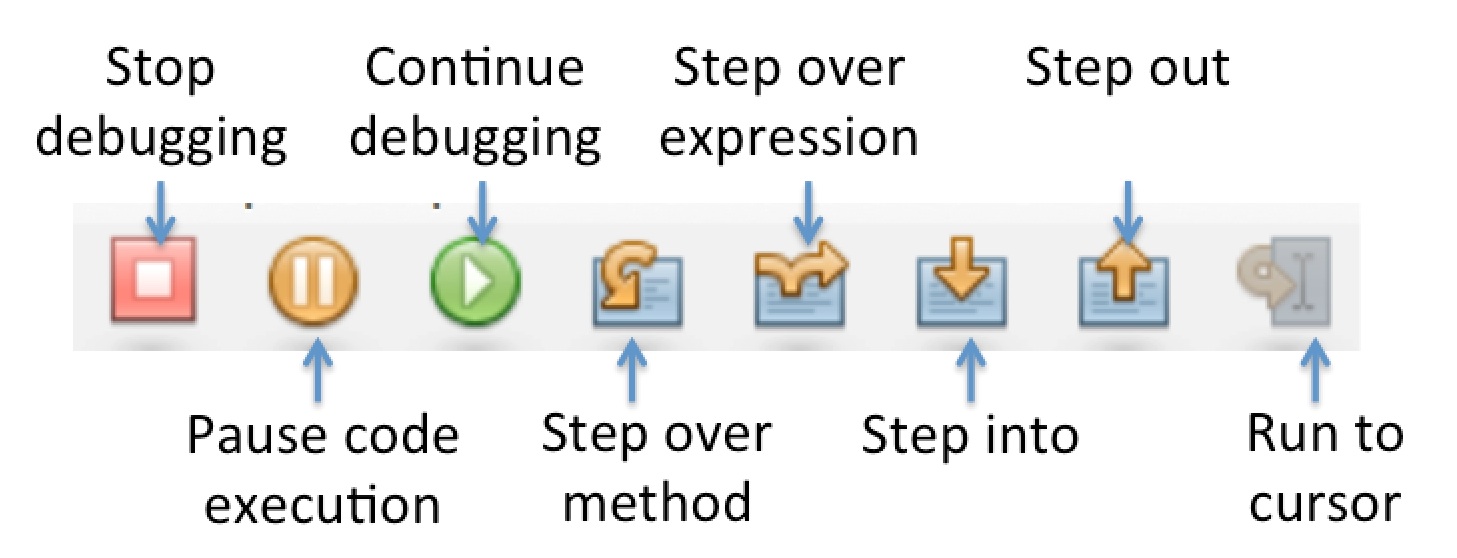
There are a series of debug buttons that help you step through the code line by line once you have hit a breakpoint, explained in Figure 26.
Stop debugging by clicking the stop debugging button. Left click in the margin on your breakpoint and that will also be removed.
This is a very brief introduction to debugging code there are more in-depth tutorials on-line such as this one from netbeans.org.
To remove the leading and trailing white space we need to use the trim in the
String class. Adjust your code in the parseLine method to reflect
that in Figure 27.
The comments above each block of code explains what is happening.
Re-run your tests, you should now see that one of them has passed, Figure 28.
The second parseLine test is still failing with the difference in size of array returned.
The test clearly passes in 6 commas in the line to be parsed, String line = ",,val1, ,2,,";.
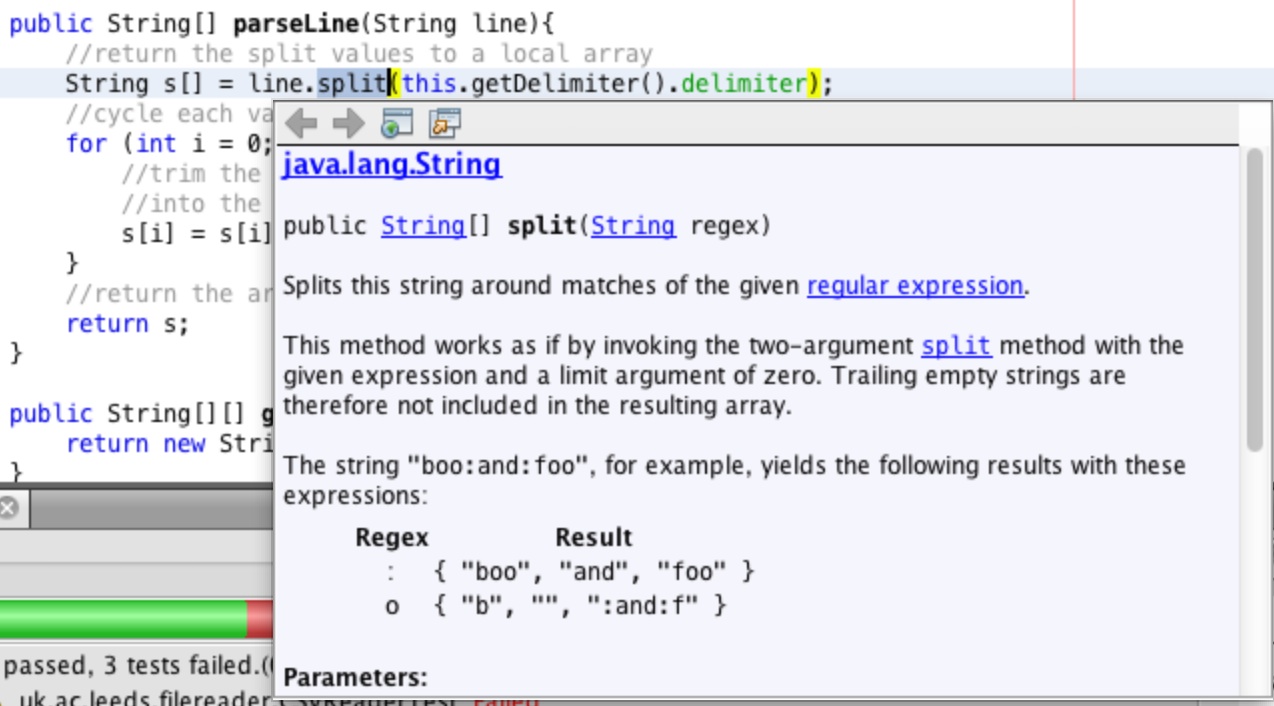
Lets look at the documentation for the String.split method to see what its behaviour is.
Go to the parseLine method and highlight the split method call and then select
Show Documentation from the Source menu. You will see the documentation
for the split method appear on screen as in Figure 29.
The documentation states that this method will remove trailing empty strings, which is the problem. The last two commas in the input line have no value following them and therefore they are not being returned because they equate to empty strings.
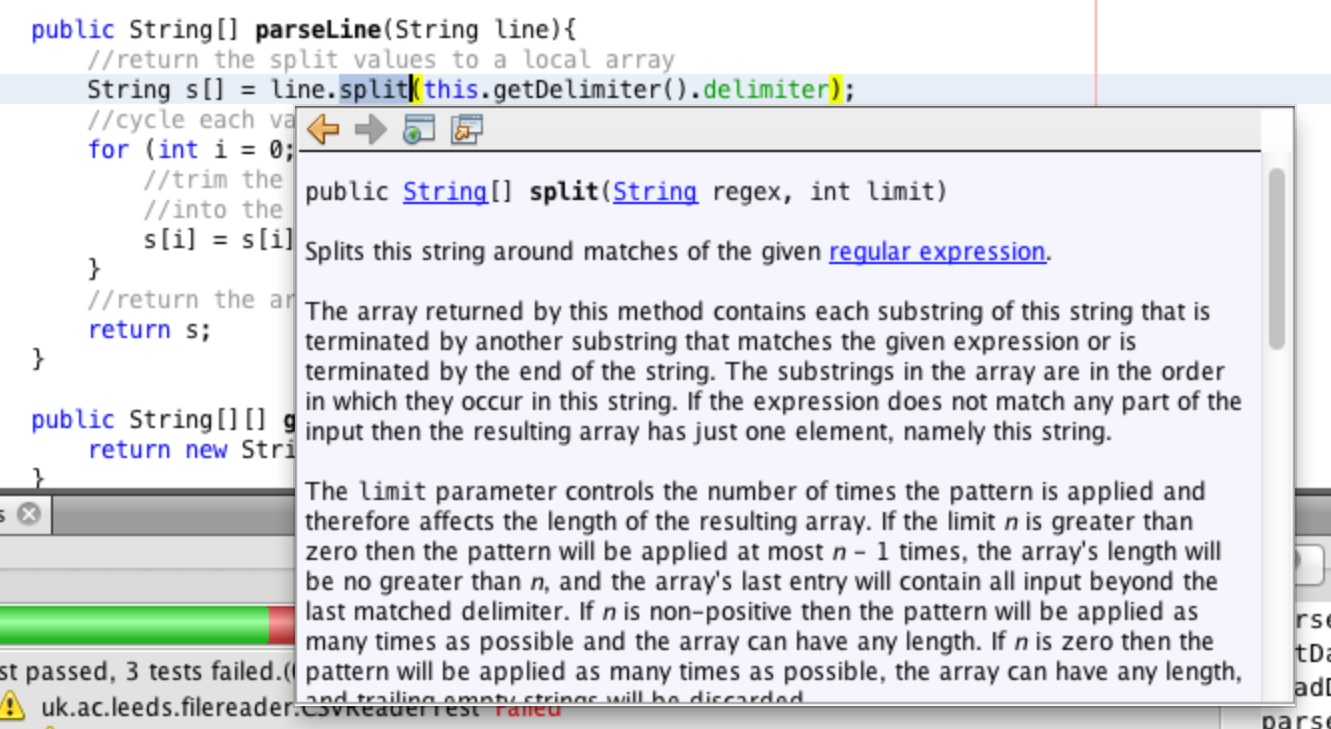
The documentation does also say that the method is overloaded and there is a two argument implementation which has extended behaviour. Click on the link to the two-argument split.
Note: full documentation for Java SE 7 can be found on the Oracle Java home pages. Documentation for older releases is also available.
The documentation is shown in Figure 30. The two argument split method will return all of the values
if the second parameter, limit is a negative number.
Change the call to the split method as shown in Figure 31 and then rerun the tests.
you will now see the output as shown in Figure 32, both of the parseLine tests pass!
Implementing loadData:
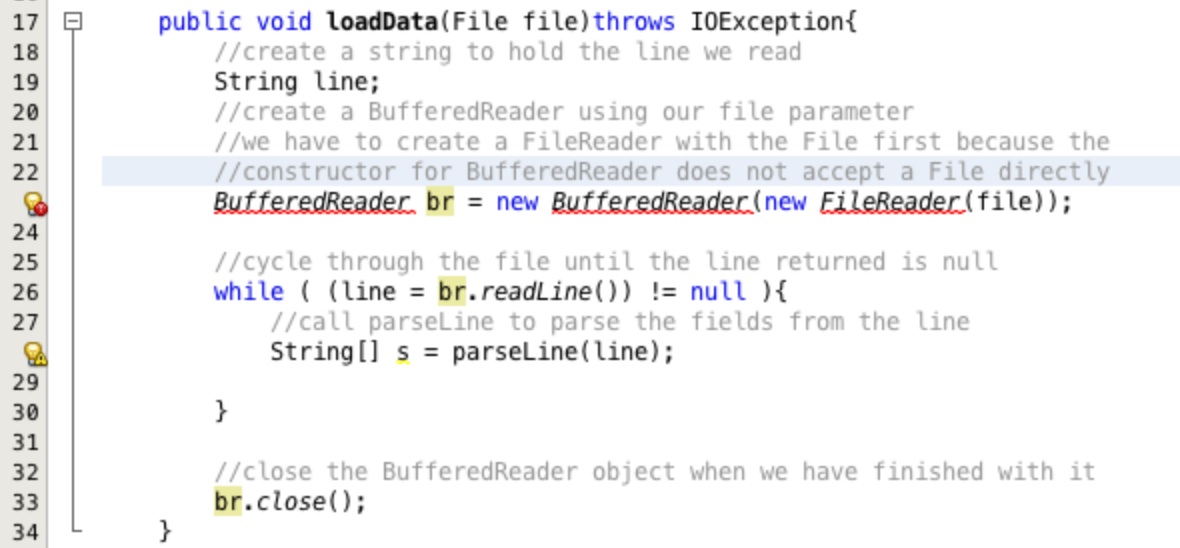
Insert the code shown in Figure 33 into your loadData method.
When you have inserted the code you will have a compile error warning in the left hand margin. Click on the warning and select to Add import for java.io.BufferedReader. The compile error marker will persist. Click on it again and select to Add import for java.io.FileReader. Your imports are now correct.
Most of this code will be relatively familiar to you from previous practical exercises and the lectures. Two
lines are more complex, BufferedReader br = new BufferedReader(new FileReader(file));
and while ( (line = br.readLine()) != null ){.
The first simply uses an anonymous object of type FileReader to bridge between the File
parameter and the BufferedReader constructor. BufferedReader does not have a constructor
which will take a File object as a parameter. We could have created a referenced FileReader
object, it is just neater and more elegant this way.
The second assigns the next line read from our BufferedReader in the variable line.
Each time this happens the line variable is checked to see if it has been set to null indicating
that the end of the file has been reached. The code cycles through the file until the return is null.
This is OK, the file is being read but we are not putting the returned values anywhere. Ideally we would use an array
to stored these values but we don't know the length of the file. To get the file length we could open up the
BufferedReader once to count the lines, close it, set up the array, open up the BufferedReader
again to read in the values, but this seems wasteful and not very elegant.
There is another way. Java provides another set of classes for storing groups of data together. These classes are known
as the collections framework. There are different structures to optimise dealing with data of different
structures. We are not going to look at all of these, you can read about them in the books recommended on the
recommended reading list. We are going to use one specific type of collection
called an ArrayList.
The major benefit of the ArrayList is that you don't have to dimension it before you use it. It expands as
you add objects to it! This is great, and I hear you cry so why bother with arrays? The truth is that for most small
tasks the collections framework is ideal. However, you cannot hold primitive data types in a collection. This again
is OK because Java supplies wrapper classes for all of the primitive data types. So we can wrap a primitive to store it
as an object as easily as Double d = new Double(yourPrimitiveDouble);.
Again great. However, it is true that a wrapper object takes up more memory than a primitive. Collections are also slower to cycle than primitive arrays. These are generally not concerns unless you are dealing with lots of data, but in social science modelling we can be! So knowing both methods is essential. Additionally the collections framework was not in early Java releases so you may come across legacy code that uses arrays and understanding them is useful.
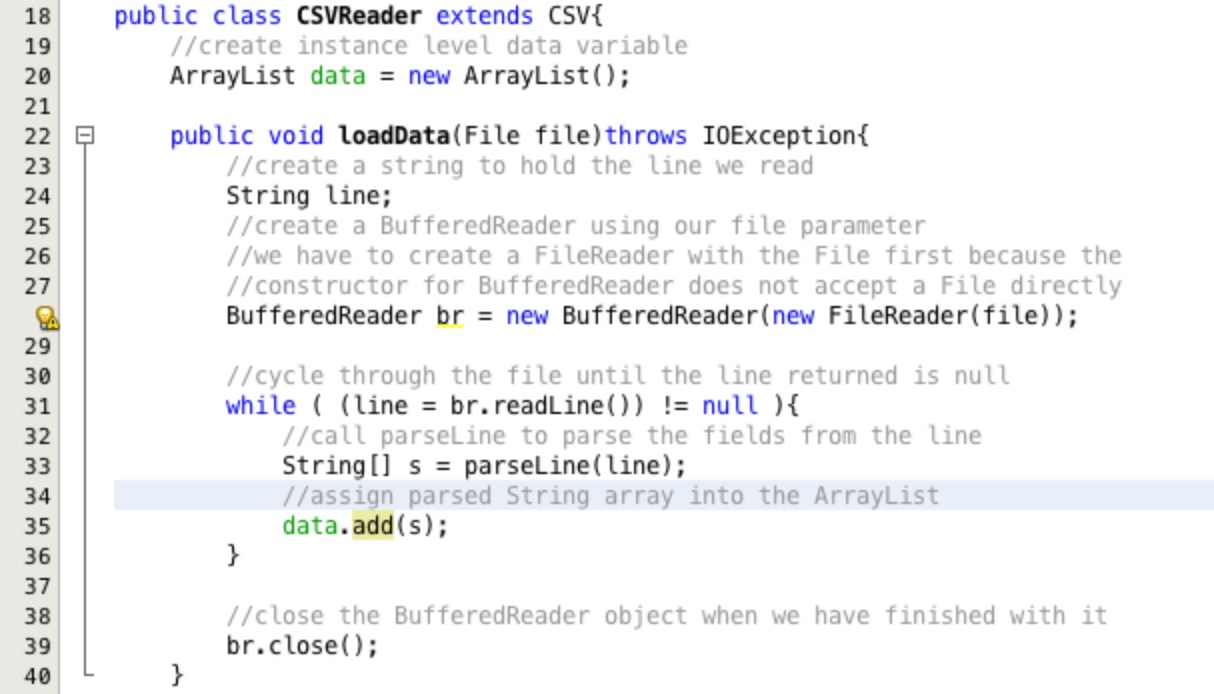
Lets create an ArrayList object to hold our data. Type in the code as an instance variable as shown in
Figure 34, line 20. Click on the compile error marker and select to Add the import for java.util.ArrayList.
Add the returned String array into the new ArrayList as shown on line 35.
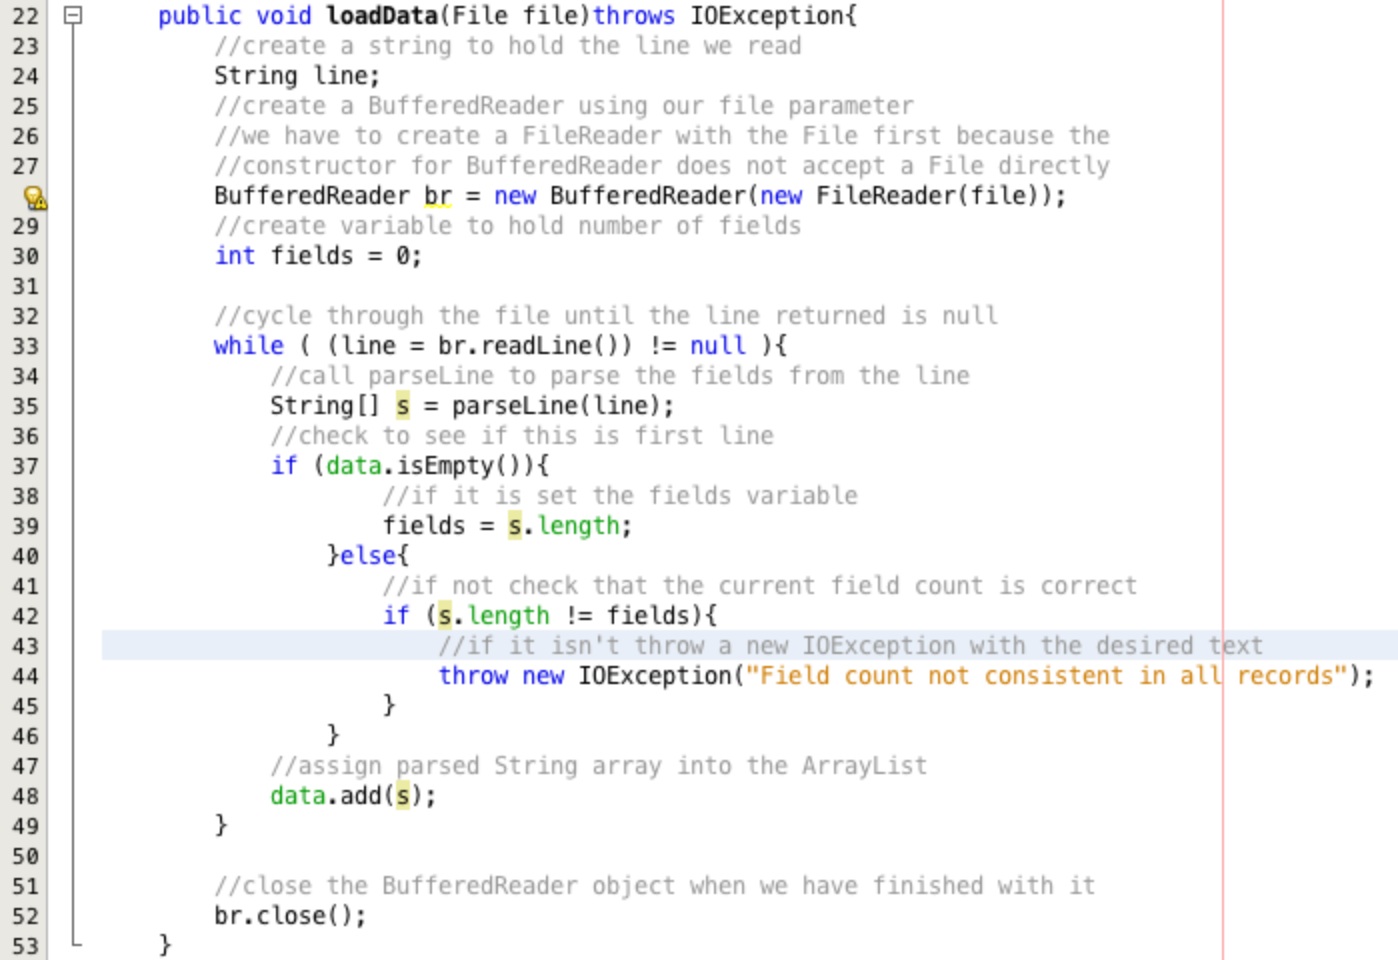
The last thing to do in this method is check that the number of fields is always the same for each line in the file. Adjust the code to be consistent with Figure 35.
On line 30 we create a new variable to hold the count of fields. The if statement starting at line 37
checks to see if we are on the first line using the ArrayList.isEmpty method. If this is the first
line then we assign the length of the returned array of values from parseLine into the variable
fields. If it is not the first line we check the length of the returned array against our field count
variable fields. If the values are not the same a new IOException is thrown.
Rerun the tests on the CSVReader file. You should now see three tests passing as in Figure 36.
Implementing getData:
The final change to make is to the getData method to make it return the data in the correct format.
Make the changes to the getData method as shown in Figure 37. Our spatial interaction model uses
arrays rather than ArrayList objects so we are going to return a two dimensional array.
Line 69 creates a new two domensional String array using the ArrayList.size method
to supply the size of the first dimension.
Line 70 uses a converter method built into ArrayList class called toArray which copies
the contents from the ArrayList into the array supplied. This is OK because our ArrayList data
contains String arrays. Remember that multidimensional arrays are just arrays of arrays...
Line 71 returns the new two dimensional String array.
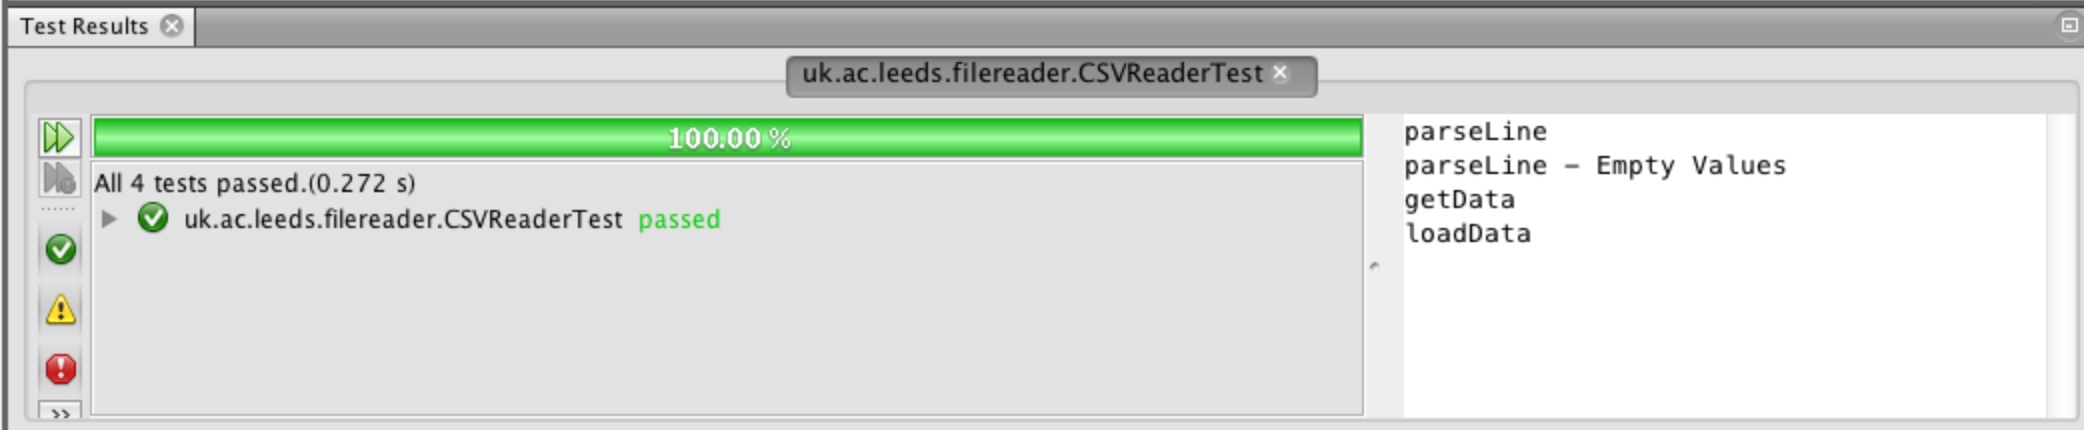
Rerun the tests for CSVReader, you should now see them all pass, Figure 38.

Summary:
- Test driven development is more of a complete programming style than a tool.
- Test driven development is powerful and produces robust easily maintained code.
- Test driven development is time consuming.
- Line by line debugging is a useful and powerful tool to assist in understanding problems with code.
- Full Application Programmable Interface (API) documentation is available online for the Java language.
- The collections framework provides a flexible alternative to arrays.
- Enums are a useful way of enforcing strict data types where select lists of information are required.
- Enums look like a small class within a class but there constructor cannot be accessed outside of the enum.
- The Java core language provides wrapper classes for all of the primitive data types.